MidVision RapidDeploy for MQ (Linux) on Azure

Microsoft Azure Installation and Support guide

1. Overview

This guide will provide step by step instructions how to start using the installed products on your Microsoft Azure instance.

This Virtual Machine image contains a ready-to-run MidVision RapidDeploy for MQ image at the selected version. In order to use this image, you need to launch it with your selected type, and log in via SSH to create and configure required Queue Managers, Queues and Listeners etc. 

Visit the MidVision RapidDeploy for MQ pages on the Microsoft Azure Marketplace

2. Launching an instance

In order to launch MidVision RapidDeploy for MQ, a few settings need to be configured on the Azure console as follows:

  1. Open new Azure Virtual Machine wizard;
  2. Select the IBM WMQ Azure image based on your requirements from gallery;
  3. Choose VM name, size, Authentication user and credentials. The Standard DS2V2/General Purpose type or larger is recommended when running IBM WebSphere MQ.  Basic DS1V2 is the minimal requirement, which will be sufficient to run Queue Managers, Queues and Listenes;
  4. Define cloud service DNS name, Regions and open endpoint ports.
Port 22 to connect via SSH (enabled by default), 
Ports 1414/1415 to reach the Queue Manager service (enabled by default),
Port 9090 to reach RapidDeploy web console (enabled by default), 
Port 20000 and 20100 to open for RapidDeploy Remote Agent (optional).

 3. Initial login and setup

The MidVision RapidDeploy for MQ products are shipped with a base binary installation but without the necessary Queue Managers created. On the first login to the instance, you will be placed into a console wizard, which will guide you through the process of creating and starting IBM WebSphere MQ Queue Managers and other configuration steps. The following is an overview of the steps you will be guided through to get started with the installed products on the instance.

Once the VM instance has started up:

  1. Log onto the instance via SSH with your Azure user and credentials. Once the instance has started up (you can see it by having “Running” status in Azure console), you can connect to the instance via any SSH client. You can log in to your instance with provisioned Azure username  and the credentials which can be based on password or certificate file.
  2. You should see the MidVision banner and then you are placed in a setup wizard.
    Welcome to                                                                                                                                             
    
     __  __ _     ___     ___     _                    ____ _                 _
    |  \/  (_) __| \ \   / (_)___(_) ___  _ __        / ___| | ___  _   _  __| |
    | |\/| | |/ _` |\ \ / /| / __| |/ _ \| '_ \ _____| |   | |/ _ \| | | |/ _` |
    | |  | | | (_| | \ V / | \__ \ | (_) | | | |_____| |___| | (_) | |_| | (_| |
    |_|  |_|_|\__,_|  \_/  |_|___/_|\___/|_| |_|      \____|_|\___/ \__,_|\__,_|
    
                                                           A MidVision Service
    
            * WebSite: https://www.midvisioncloud.com/product-category/microsoft-azure-marketplace
            * Support: http://support.midvision.com/redmine/projects/devtestcloud
            * Forum:   https://www.midvisioncloud.com/community      
    
    Please run 'sudo su - mqm' to start using provided services.
    
    Welcome, this is MidVisionCloud Websphere MQ image first run configuration
    
    Note that you can rerun this configuration wizard again by executing /home/mqm/firstrunsetup.sh script
    
    Configuration steps
    - Create and Start a default IBM MQ web console
    - Set RapidDeploy framework initial password
    - Open ports on RHEL firewall
  3. On the first login to the instance, you will be placed into a console wizard, which will guide you through the process of creating and configuring IBM WebSphere MQ. The following is an overview of the steps you will be guided through to create the required profiles on the instance:
    1. Create and Start a default IBM MQ web console. (Only in version 9.1)
    2. Set initial password for RapidDeploy user “mvadmin”.
    3. Choose which ports to open on Red Hat Linux firewall. You should open port 9090 for the RapidDeploy web console if required. You should open the required ports for MQ, typically 1414 and 1415.

    All inputs asking for specific data can be left as blank just by hitting  [return] , which will pick the default value displayed at the end of the question. Please refer to IBM documentation for WebSphere MQ configuration.

4. Accessing the web and command line consoles

4.1 Access the IBM MQ Web Console (Only in version 9.1)

If you choose to create and start IBM MQ  Web Console then you can access it on:

https://[publicip]:9443/ibmmq/console

Note: make sure you have port 9443 open in your Security group when trying to access IBM MQ web console. Your password for the default username ‘ mqadmin ‘ is set to ” mvadmin ” but you can change it by just editing a file

/var/mqm/web/installations/Installation1/servers/mqweb/mqwebuser.xml

and restarting web console:

[mqm] endmqweb
[mqm] strmqweb
 

4.2 Subsequent logins via SSH to the instance

When logging into the instance after the first time, you will be asked if you wish to enter the console menu. Selecting ‘y‘ places you in a management console. Selecting ‘n‘ will take you to a command prompt. You can access the menu at any time by typing ‘menu’ at the command prompt. In the menu context, after first login you can perform the following actions:

  • Create a default configuration
  • Display IBM MQ installation details
  • Manage IBM MQ – this option is very helpful and lets you create/manage/delete queue managers, listeners, channels and queues
  • Open Firewall Port if you wish. Usually you will need to open ports 1414 and 1415
Main Application Administration Menu on [hostname]
========================================================
Please select from list
 1. Create a default configuration
 2. Display Status for [hostname]
 3. Manage IBM MQ
 4. Open Firewall Port on [hostname]
 5. Help for the Management menu
 x. Quit
>1

If you would like to create a default basic MQ configuration to be able to quickly connect to your MQ instance, then select the first option. You will be asked to provide the name for the default QM, name of the listener, port for listener and finally the name of the default Channel

Define a new Queue Manager 
Please type the name of Queue Manager or submit blank for default value 'QMGR1'
QMGR1
Define a new listener 
Please provide the name of the new Listener or submit blank for default value 'QMLIST1'
QMLIST1
Please provide the port of the new Listener or submit blank for default value '1414'
1414
Define a new Channel 
Please provide the name of the new Channel or submit blank for default value 'QMCHNL1'
DEFAULTCHANNEL

Then you should be able to see the confirmation that the default configuration has been created:

The default configuration has been created and it is running now. See connection details below: 
Public hostname: [hostname]
Queue Manager:  QMGR1
Port:  1414
Server connection channel:  DEFAULTCHANNEL

Use these QM details to obtain connection between your MQ Client and this newly created and started Queue Manager. For example in WebSphere Application Server :

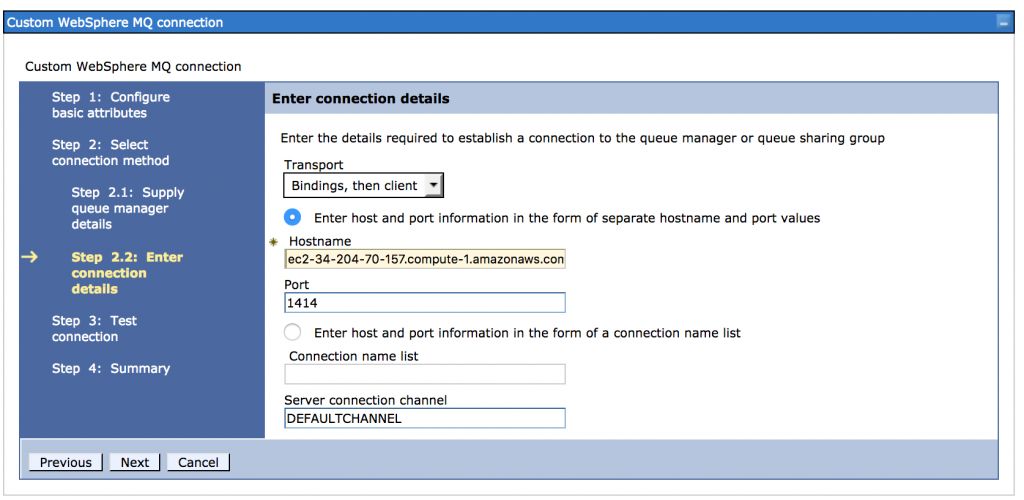
If you have any problems with connecting to the default QM please take a look at the Troubleshooting section.

4.3 Sample configuration created using our menu script

We prepared sample configuration of WMQ for you. Following the steps below you will create two queue managers with local and remote queues, then you will define listeners and channels that will allow communication between these queue managers.

 
 1. Select Manage IBM MQ from main menu and Create new Queue Managers with names QMGRA and QMGRB
 2. Select QMGRA and then select option 5 to start it. 
 3. You can check if QMGRA is running using option 6
 4. Select Manage Queues option for QMGRA and select option 2 to define new transmission queue (name: QMGRB.XMIT.DF, init queue name: SYSTEM.CHANNEL.INITQ)
 5. Now select option 1 to define new local queue (name:QMGRB.QMGRA.RQSTIN)
 6. Using option 5 to define new remote queue (name: QMGRA.QMGRB.RQST, transmission queue: QMGRB.XMIT.DF, remote queue: QMGRA.QMGRB.RQSTIN, queue manager: QMGRB)
 7. Leave current menu using x. Quit option and select Manage Channels for QMGRA
 8. Define Sender Channel (name: QMGRA.QMGRB.DF, transmission queue name: QMGRB.XMIT.DF, ip address: localhost, port: 1414)
 9. Define Receiver Channel (name: QMGRB.QMGRA.DF)
 10. Leave current menu and select Manage Listener
 11. Define new Listener (name: LISTENER.TCP.QMGRB, port: 1415)
 12. Go to main menu and Select Queue Manager QMGRB
 13. Start QMGRB and then go to Manage Queues for this queue manager
 14. Define Transmission queue (name: QMGRA.XMIT.DF, init queue name: SYSTEM.CHANNEL.INITQ)
 15. Define Local queue (name: QMGRA.QMGRB.RQSTIN)
 16. Define Remote queue (name: QMGRB.QMGRA.RQST, transmission queue name: QMGRA.XMIT.DF, remote queue: QMGRB.QMGRA.RQSTIN, queue manager: QMGRA)
 17. Go to Manage Channels option for QMGRB and define new Sender Channel (name: QMGRB.QMGRA.DF, transmission queue name: QMGRA.XMIT.DF, ip address: localhost, port 1415) 
 18. Define Receiver Channel for QMGRB: (name: QMGRA.QMGRB.DF) 
 19. Go to Manage Listeners for QMGRB and define new Listener (name: LISTENER.TCP.QMGRA, port: 1414)
 20. Use option 3 to Start Listener (select LISTENER.TCP.QMGRA) and then use option 5 to Display status of Listeners for QMGRB
 21. Go to main menu and now select QMGRA
 22. Go to Manage Listeners and start Listener LISTENER.TCP.QMGRB
 23. Go to Manage Channels for QMGRA and Start Channel: QMGRA.QMGRB.DF
 24. Select Queue Manager QMGRB, go to Manage Channels and Start Channel: QMGRB.QMGRA.DF)

Of course you can still use all the commands directly from WMQ without using our prepared menu.

4.4 Access the RapidDeploy Web Console

RapidDeploy server and agent will start up automatically when you start your instance. You can access the web console on:

http://[publicip]:9090/MidVision

Note: make sure you have port 9090 open in your Security group when trying to access RapidDeploy web console. For the first time, you can set the password for the default username ” mvadmin “. 

5. Maintaining the installation

The following sections cover some of the activities you might want to perform after the instance has been started.
  • mqm: This is the default user, which you can log in as. It is permitted to use all SUDO rights. To switch to the root user, type “sudo su“.
  • root:      This is the superuser in linux systems. You can log in as any other user without using passwords. E.g:  “su mqm

Red Hat Enterprise Linux instances are shipped with a firewall by default to protect your machine. For security reasons, the instance is only accessible via SSH (port 22) at first, so further ports can be opened on the firewall as needed. You will need to open all the ports in this internal firewall, which you have open in your Security group. There is a script placed in the user home of the mqm user (/home/mqm), which is also the starting location when logged in. You will need to be the root user to run this script. Example usage:

[mqm@ ] sudo ./open-firewall.sh 9090
Open firewall port 9090 iptables: Saving firewall rules to /etc/sysconfig/iptables:[ OK ]
 

There are a few scripts and other files in mqm and root users home directory, which will need to remain unchanged in order to keep the provided scripts working. There are a set of scripts in mqm home directory. Those scripts are executed when logging into the instance controlled by  .bash_profile , but you can also execute them manually whenever they are needed. There are some hidden files used as well,  .firstrun  indicates that the setup wizard has already ran once.

To restart RapidDeploy manually from the filesystem, use the rapiddeploy linux service. The RapidDeploy version is 5.0. RapidDeploy home is located at /var/rd/midvision Example usage:

[mqm@ ] sudo service rapiddeploystart start 
[mqm@ ] sudo service rapiddeploystart stop

The RapidDeploy server uses an in-memory database, so your RapidDeploy framework needs to be shut down properly to save your work. This happens when the instance is stopping or when calling the stop service manually from the command line. Note that on instance restart, unsaved data will be lost.

If you don’t want to use RapidDeploy and free memory on your instance you can stop rapiddeploy service using command:

[mqm@ ] sudo service rapiddeploystart stop

Then in order to make sure it will not start when an instance starts again run this command:

[mqm@ ] sudo systemctl disable rapiddeploystart.service

For security reasons, you will need to change the default password (default value is ‘mvadmin‘) for user mvadmin. This will be requested the first time only when you log in to the RapidDeploy server.

6. Troubleshooting

6.1 Session loss during setup

If you lose your SSH connection to the target instance during the first run setup script execution (e.g. as a result of a network problem), we advise you to delete and recreate the Microsoft Azure instance and run the script again.

6.2 Problem with the connection to Queue Manager

Common ERRORS and issues with obtaining connection:

  • MQRC_UNKNOWN_CHANNEL_NAME

    – you need to make sure the QM is actually running and the channel you selected exists. Some of the MQ clients like WAS for example require capital letters in configuration, so for example even if your channel name is “defaultChannel” you need to put “DEFAULTCHANNEL” in your MQ Client

    – check if your Listener port is correct and if the Listener has Running status

  •  MQRC_NOT_AUTHORIZED
    Usually it happens because of the following reasons:
    – CHLAUTH parameter is enabled in your QM configuration. Disable this parameter if you don’t need it or read more about this attribute on IBM documentation pages
    runmqsc QMGR1
      display QMGR
      ALTER QMGR CHLAUTH(DISABLED)
      end
    

    – the MQ Client user is not permitted to connect to QM

    [mqm@hostname ~]$ setmqaut -m QMGR1 -t qmgr -g root +all
    

    – the MQ Client requires the user to have password. In our instance there is no password set for mqm user but you can easily change it

    [mqm@hostname ~]$ sudo su
    [root@hostname mqm]# passwd mqm
    New password: 
    Retype new password: 
    passwd: all authentication tokens updated successfully.
    

6.3 Contacting MidVision support

Please visit our support website.