
Red Hat Fuse on AWS
Amazon EC2 Installation guide
1. Overview
This guide will provide step by step instructions how to start using the installed products on your AWS EC2 instance.
This AMI contains a ready-to-run Red Hat Fuse image at the selected version. In order to use this image, you need to launch it with your selected type, and log in via SSH to activate it.

2. Launching an instance
In order to launch Fuse, a few settings need to be configured on the AWS console as follows. The instructions for launching an instance differ depending on where you launch from. Initially you will launch the instance from the AWS Marketplace.
-
Select the product based on your requirements in the AWS Marketplace;
-
Click on the link to go to that versions page in AWS Marketplace;
-
Check the ‘
Other Versions‘ link to see other versions available (you can select the actual version later). -
Under ‘
Pricing Details‘ panel select your Region and either Hourly or Yearly fees. -
Click on the ‘
Continue‘, button to go to the ‘1-Click Launch‘ tab on the configuration page; -
On the ‘
Software Pricing‘ panel choose your instance type and pricing type; -
On the ‘
Version‘ panel, select the fix pack version you require; -
On the ‘
Region‘ panel, select the Region you require; -
On the ‘
EC2 Instance Type‘ panel, choose the instance type.TheM1.mediumtype or larger is recommended when running Fuse.M1.smallis the minimal requirement. Larger instances may be required based on the expected resource use of each; -
On the ‘
VPC Settings‘ panel Configure the VPC settings to your requirements or leave the defaults; -
On the ‘
Security Group‘ panel, specify the security group. The security group needs to permit to following ports [note that the internal firewall will be configured later to permit only ports used by JBoss]:Port 22 to connect via SSH (enabled by default), Port 9990 and 8443 to connect to the running JBoss admin console Port 8080 and to connect to the running Fuse console
- If you don’t already have a security group as above, go to your EC2 Control Panel and select ‘
Security Groups‘ under ‘Network & Security‘ - Click ‘
Create Security Group‘ button - To open all ports, Click ‘
Add Rule‘. - In the ‘
Type‘ dropdown, Specify ‘All TCP‘ or your preferred configuration. - In the ‘
Source‘ dropdown, Specify ‘Anywhere‘ or your preferred configuration.
- If you don’t already have a security group as above, go to your EC2 Control Panel and select ‘
-
On the ‘
Key Pair‘ panel, select a key pair to use. You will need this key later to connect to the instance. -
Scroll back to the top of the page and click ‘
Accept Software Terms and Launch with 1-Click‘. -
The Instance will be Launched.
-
Select the AMI based on your requirements;
-
Right click on the AMI, or from the drop down menu, choose the ‘
Launch’ option; -
On the ‘
Choose Instance Type‘ tab, choose the instance type.TheM1.mediumtype or larger is recommended when running Fuse.M1.smallis the minimal requirement. Larger instances may be required based on the number of the expected resource use of each; Click ‘Next: Configure Instance Details‘. -
On the ‘
Configure Instance‘ tab Configure the instance to your requirements or leave the defaults. Click ‘Next: Add Storage‘. -
On the ‘
Add Storage‘ tab, add additional storage as required or leave as default. Click ‘Next: Tag Instance‘. -
On the ‘
Tag Instance‘ tab, Tag your instance with a suitable name. Click ‘Next: Configure Security Group'. -
On the ‘
Configure Security Group‘ tab, specify the security group. The security group needs to permit to following ports:Port 22 to connect via SSH (enabled by default), Port 9990 and 8443 to connect to the running JBoss admin console Port 8080 and to connect to the running Fuse console
- To open all ports, Click ‘
Add Rule‘. - In the ‘
Type‘ dropdown, Specify ‘All TCP‘ or your preferred configuration. - In the ‘
Source‘ dropdown, Specify ‘Anywhere‘ or your preferred configuration.
- To open all ports, Click ‘
-
Click ‘
Review and Launch‘. -
Review settings, then click ‘
Launch‘. -
Add your key pair, Check the ‘Acknowledge key file access’ checkbox and click ‘
Launch Instance‘.
3. Initial login and setup
The Red Hat Fuse is shipped with a base binary installation. On the first login to the instance – after logging onto the instance via SSH as the ‘ec2-user’ user you will see basic information about Fuse installation. The following is an overview of the steps you will be guided through to create the required profiles on the instance: Once the instance has started up (you can see it by having ” 2/2 checks passed ” in EC2 console).
-
Log onto the instance from the EC2 console or via SSH as the ‘
ec2-user’ user, using the key you selected above. For example:-
From the EC2 console by clicking the “
Connect to your instance” button with username “ec2-user“, using the previously (instance launch-time) selected.pemkeyfile. -
Via SSH from your desktop, for example
ssh -i ./MidVisionUSMC.pem ec2-user@ec2-52-87-198-23.compute-1.amazonaws.com
-
-
You should see the MidVision banner and then you are placed in a setup wizard.
Welcome to __ __ _ ___ ___ _ ____ _ _ | \/ (_) __| \ \ / (_)___(_) ___ _ __ / ___| | ___ _ _ __| | | |\/| | |/ _` |\ \ / /| / __| |/ _ \| ’_ \ _____| | | |/ _ \| | | |/ _` | | | | | | (_| | \ V / | \__ \ | (_) | | | |_____| |___| | (_) | |_| | (_| | |_| |_|_|\__,_| \_/ |_|___/_|\___/|_| |_| \____|_|\___/ \__,_|\__,_| A MidVision Service
* WebSite: https://www.midvisioncloud.com/product-category/amazon-web-services-marketplace * Support: http://support.midvision.com/redmine/projects/devtestcloud * Forum: https://www.midvisioncloud.com/community
Welcome, this is MidVisionCloud Red Hat Fuse image. You can access Red Hat Fuse admin console on http://ec2-54-161-43-160.compute-1.amazonaws.com:8080/hawtio. Log in with admin/i-09b70caac8ef79569 . Red Hat Fuse is running on JBoss EAP 7.2.1 which is available on http://ec2-54-161-43-160.compute-1.amazonaws.com:9990 with the same credentials. Note that you can add a new Red Hat Fuse user or change the password using sudo /opt/jboss-eap-7.2/bin/add-user.sh script
4. Accessing the web consoles
4.1 Access the Red Hat Fuse console
Confirm installation. The Red Hat Fuse console should be running on port 8080:
http://[publicip]:8080/hawtio
You can log in as a default admin user, use your [instanceId] as password.
4.2 Access the Red Hat JBoss Enterprise Application Platform
Confirm installation. The JBoss EAP admin console should be running on port 9990:
http://[publicip]:9990
You can log in as a default admin user, use your [instanceId] as password.
5. Maintaining the installation
The following sections cover some of the activities you might want to perform after the instance has been started.
Instance Users
- root: This is the superuser in linux systems. You can log in as any other user without using passwords. E.g: “
su ec2-user“ - ec2-user: This user does not have SUDO rights. If you want to switch back to root user, type “
exit“, this will take you back to the previous user session.
Starting/stopping JBoss EAP and Fuse
Red Hat Fuse is already deployed to JBoss EAP 7.2. You can find JBoss EAP installation under :
/opt/jboss-eap-7.2
JBoss has been started as a standalone server (as root user) using
/opt/jboss-eap-7.2/bin/standalone.sh -c standalone-full.xml -b 0.0.0.0 -bmanagement 0.0.0.0 &
You can stop the server as root user:
/opt/jboss-eap-7.2/bin/jboss-cli.sh —connect —command=:shutdown
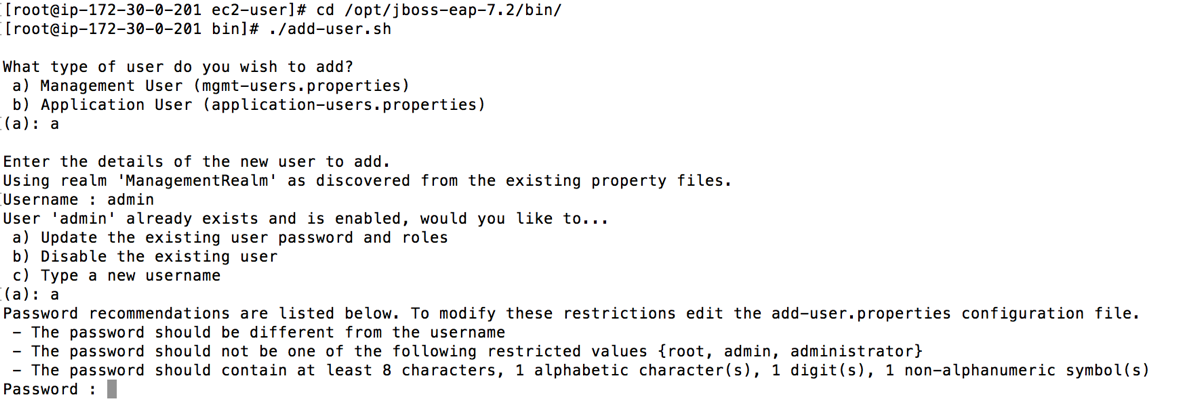
Changing the password for an admin user (JBoss and Red Hat Fuse)
As mentioned above along with the JBoss EAP installation there is one admin console user created with password set to your [instanceId]. See the example below for the admin user:
Enabling and Disabling Red Hat Decision Manager service
Red Hat Fuse deployed on JBoss EAP works as a service and starts automatically when you launch an instance.
You can disable/enable it using systemctl command:
systemctl stop/start jboss-eap.service
6. Troubleshooting
6.1 Session loss during setup
If you lose your SSH connection to the target instance during the first run setup script execution (e.g. as a result of a network problem), we advise you to delete and recreate the EC2 instance and run the script again.
6.2 Contacting MidVision support
Please visit our support website.