
Upload our template, create AWS Cloud Formation stack and have your IBM WebSphere Application Server architecture ready
This guide will provide step by step instructions how to create AWS Cloud Formation stack containing IBM WebSphere Application Server Network Deployment cluster using template prepared by us.
1. Overview
Being able to install your IBM WebSphere Application Server Network Deployment licensed and ready to go in the cloud is a great thing. Here you can find our IBM WAS ND image which lets you do it with just a few clicks. But in real world scenario having WebSphere Application Server running on just one Amazon EC2 instance is not always the best solution. To make your architecture better for high availability and to increase capacity you may want to have a WebSphere Application Server cluster
And this is the reason we decided to prepare AWS Cloud Formation template to help you create your IBM WAS ND Cluster architecture based on our IBM WebSphere Application Server Network Deployment base image.
2. Solution
AWS Cloud Formation stack that you will create by using our template contains 3 AWS EC2 instances (all of them are based on our IBM WebSphere Application Server Network Deployment image). On every EC2 instance there is a WebSphere profile (1 Deployment Manager and 2 Node Agents participating in the cluster).
2.1 Step by step tutorial how to use our template
- Download template by clicking the button above or from here.
- Log in to you AWS account and choose AWS Cloud Formation from Management Tools section
- You should now see blue “
Create Stack” button on the top left corner. - Click “
Create Stack” and then from “Choose template” section use “Upload a template to Amazon S3” and selected downloaded template and click “Next”. - You will now have to specify a few parameters to configure your WAS ND Cluster.
– “Stack name” – this is just a name of your stack,
– “InstanceTypeParam” – instance type that you want to assign to your AWS EC2 instances,
– “KeyName” – select one of your existing keys - After specyfing parameters click “
Next” button, - On the next panel also click “Next”,
- Review your configuration and click “
Create”. Note that during the creation of stack 3 Elastic IPs are created so make sure that you can create 3 IP assosiactions at this region. - You will need to wait about 25 minutes to have your stack ready.
- When stack is created you can go to your EC2 instances list and see that there are 3 new instances initialising :
DMGR,NodeAgent1,NodeAgent2.
What is worth to mention even if on your EC2 list you can see that instances Status Check is “2/2 checks passed” it is possible that scripts that are creating WebSphere profiles and Channels are still running. To be sure that your resources are create login to the instances
3. Initial login
Once the instance has started up (you can see it by having ” 2/2 checks passed ” in EC2 console).- Log onto the instance from the EC2 console or via SSH as the ‘
midvision’ user, using the key you selected above. For example:- From the EC2 console by clicking the “
Connect to your instance” button with username “midvision“, using the previously selected.pemkeyfile. - Via SSH from your desktop, for example
ssh -i ./MidVisionUSMC.pem midvision@ec2-52-87-198-23.compute-1.amazonaws.com
- From the EC2 console by clicking the “
- You should see the MidVision banner and then you are placed in a setup wizard.
Welcome to __ __ _ ___ ___ _ ____ _ _ | \/ (_) __| \ \ / (_)___(_) ___ _ __ / ___| | ___ _ _ __| | | |\/| | |/ _` |\ \ / /| / __| |/ _ \| '_ \ _____| | | |/ _ \| | | |/ _` | | | | | | (_| | \ V / | \__ \ | (_) | | | |_____| |___| | (_) | |_| | (_| | |_| |_|_|\__,_| \_/ |_|___/_|\___/|_| |_| \____|_|\___/ \__,_|\__,_| A MidVision Service * WebSite: https://midvisioncloud.com/ * Support: http://support.midvision.com/redmine/projects/devtestcloud * Forum: https://www.midvisioncloud.com/community/ [midvision@ip-10-203-178-197 ~]$ - Set initial password for RapidDeploy user “
mvadmin“. - Choose which ports to open on Red Hat Linux firewall. You should open port
9090for the RapidDeploy web console if required.
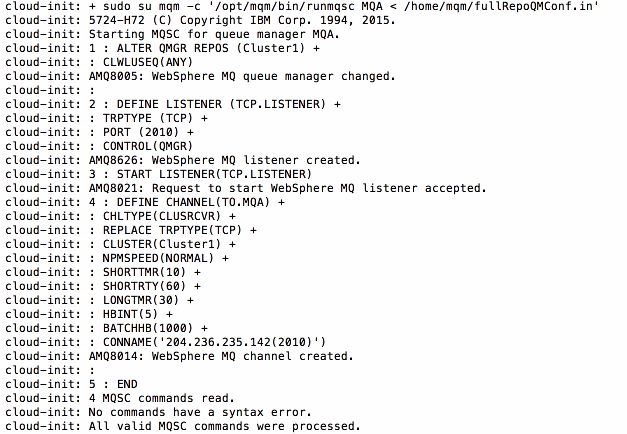
See the cloud-init.log file to make sure that everything is defined and configured.
less /var/log/cloud-init.log
You should see similar logs to the ones shown to the right (click to enlarge).
4. Maintaining your IBM WebSphere ND Cluster
As it was mentioned before 3 EC2 instances are created. Each of them contains IBM WebSphere Application Server Network Deployment v.8.5.5.8. DMGR instance contains running Deployment Manager profile –dmgr in:
/opt/IBM/WebSphere/AppServer/profiles/Dmgr01NodeAgent1 contains running NodeAgent
node01 in:
/opt/IBM/WebSphere/AppServer/profiles/AppSvr01and NodeAgent2 contains running NodeAgent
node02 in:
/opt/IBM/WebSphere/AppServer/profiles/AppSvr02Node agents profiles are both federated to Deployment Manager profile. You can access Deployment Manager web console by visiting:
https://DMGR-public-dns:28001/ibm/console